Archive
Rolling Tote for the Expression
I received my new tote for the Expression machine today, and it’s not a project, but I thought I’d share, to show everyone how nice this bag is!

It was so exciting to get this! I can’t wait to use it, I often take my machine to other people’s houses. It was not my first choice, in the color department. I wanted to get the one that was all pink, with brown accents. That one was not polka-dotted. This was my second choice. I got it because it was about $20 cheaper. I don’t know why, it was the same bag, from the same place.

As you can see, it has two roomy pockets on the outside. I keep the Cricut markers here, and the spatula, a bone folder, zig pen, small scissors, and a few Stanley picks.
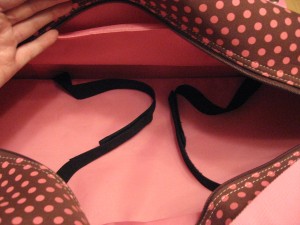
The above pic shows the inside, and the straps that lock the machine into place. There is a nice padding in the bottom, and those straps have Velcro, so the machine does not move around. I put my machine in there, and lock it down. Then I put in the cord, a Xyron sticker machine, three boxed cartridges, and a folder with cut images. I fold the folder over the machine, as it is a 12″x12″ size. I didn’t get a good shot of the nice little pocket on the inside lining. I put my 3, 12″x12″ mats in there, and fold over the machine, as well. This bag is so roomy, it seems to fit everything in it!

The picture above shows the rollerblade wheels, that most nice bags have, nowadays. You can also see the shoulderstrap, although I doubt I’ll be using it, since it’s pretty heavy, when full.

Here you can see it on the wheels, with the handle pulled out. It’s so pretty, the dog is checking it out too! You can get one at www.amazon.com. Just type in “Cricut Expression Rolling Tote”. The only bad thing about it is they are very limited in colors, and there are mostly polka dots. I’m not really into polka dots, but I like the pink and brown together. For the die hards, they have a white with green polka dots. Happy shopping!
Computer Decor
This is the last thing I did tonight, with my Cricut machine. I was still using Contact paper, and decided to decorate my little computer. It’s a sapphire blue color, so I thought it would look good with white.

I used the “Home Accents” cartridge, for the butterfly. The dice are on “Indie Art”.

In case you didn’t read about my flowerpots, I’ll tell you exactly what I did. I used Contact paper, in white of course. I set the blade depth at “4”, what I usually use, and set the pressure at “5”. I used a medium or high speed, unless it was a small, or intricate design. For both of these designs, I set the speed at low, or minimum.

I think I cut the butterfly at 5″. And the dice were set at one inch. HAPPY CRICUTTING!
Cricut Flower Pot
Here’s one of my latest Cricut projects. I decided to dress up some cheap plastic flower pots, with designs. I bought a roll of Contact paper, as it was cheap.

I mostly used the “Walk in my Garden” cartridge. There are some “Paper pups”, “Home Accents”, “Home Decor”, and maybe a little “Indie Art”. Not much of the last one, though, if any.

I used a blade depth of “4”. Pressure setting all the way, and speed set at high, unless it was an intricate design, or something really small. Then I set it at minimum speed.


I watched a video where someone put the paper on the mat upside down. I did this for several of these. Then I tried it right side up, and they seemed to work just as well. I really don’t think it made a difference. Good luck, and have fun with your summertime crafting!
“Paper Pups” Layout
Here is my first scrapbook page, using the “Paper Pups” cartridge.
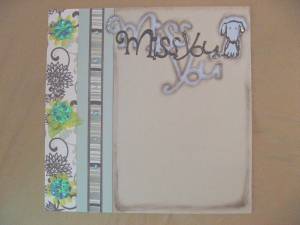
I used paper from a clearanced out scrapbook kit from Wal-Mart. I don’t remember what it’s called. The ribbon came with the kit. I ran a strip of it down the side, and put some jewels on it, also from the kit. The flowers are blossums that I bought at the local rubber stamp convention, last year. The leaves came with them. I used brads to attach the flowers. I got the flower holes lined up perfectly, using the “Big Bite Crop-a-dile”. It is so awesome! I punched the holes, then layered the flowers in, with mini brads.

After cutting out the words, and the pup, I did a little distressing, with the non-smear chalks. This helped to pop out the lettering, and the picture area. I did use the Cricut brown marker to make the pup’s eyes. It was the perfect color. After getting everything glued down and layered, I used some clear crystal laquer, to accent the die cuts. (Just a note about my crystal laquer: I bought this bottle, when I very first started stamping, at least 10 years ago, it may even be older than that, I remember I bought it at the very first rubber stamp store that my friend and I found, and it’s one of my first stamping accents. I was almost expecting it to be dried up, but it worked just as well as when brand new! And it came in a plastic bottle, I don’t think I even had to use the needle tool to unplug it! How’s that for good stuff?) Added a few crystals to the “M”, in “miss you”. They came with the kit.

I apologize that I do not remember exactly how I cut the design. That’s what I get, for not posting right when I get it done. I got behind on here, and this has been waiting for several weeks to get posted. I do know that I used either the shadow, or blackout feature, and maybe a bigger size, for the back layer. I think that I was trying to get a perfect fit, and it did not turn out, so I played around with the image, until I liked it. But then found I had to use the chalks, to get the design to show up very well, considering the paper and colors used. Sometimes things don’t go as planned, but if we keep trying, we can still get something worth using.
Holographic chipboard Title
I decided to make a geneology book for my dad. He’s been hitting the internet, finding all kinds of photos, and articles, to go with our family history. This is something I made to put on the book. (Note: The book is far from being done, but I am slowly working on it.)
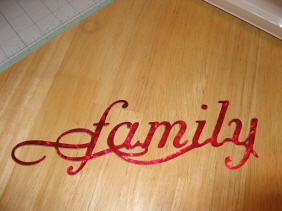
I actually had this done, for awhile, I’m trying to catch up on my posts, with what I have done. For the chipboard, I used an empty Drumstick ice cream box. I think the cartridge was “Home Accents”. I’m sorry I do not remember what size I cut it at. Looks like somewhere around 2-3″.
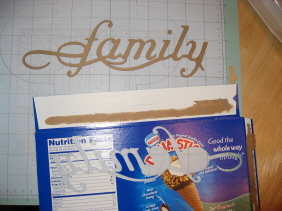
After cutting the chipboard, I then made the same cut, using this really thin, red holographic paper I bought at convention several years ago, and never used. I have different colors, but I thought red would look good for this project. And of course, I lowered the blade depth, because the paper is really thin.
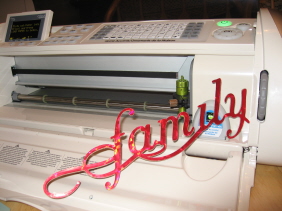
This shows the finished design. I just used a Zig two way glue pen, to adhere to the chipboard. The paper was so thin, I was able to glue small amounts at a time, lining it up perfectly, keeping the unglued portion flipped backward. It was very easy!
Prismacolor Artwork
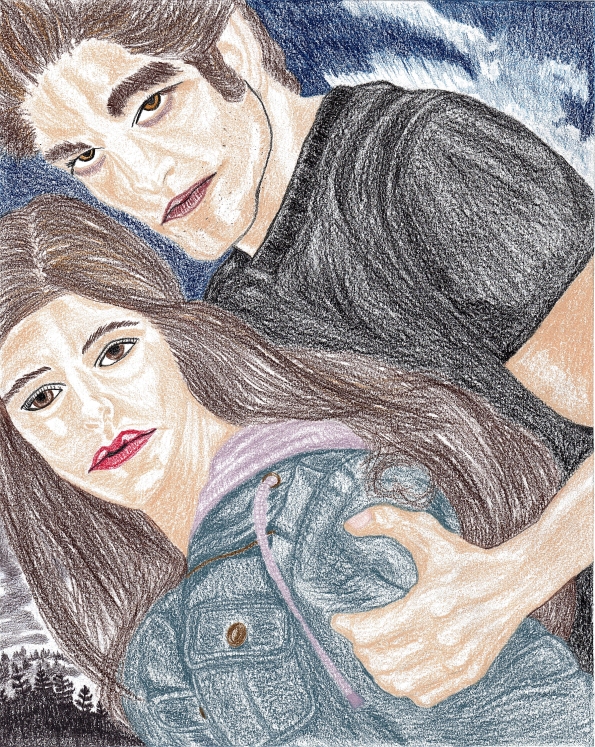
Ok, so I’m not a professional artist. But I’d like to be. Took a few drawing classes in high school. I decided to get out my Prismacolors and have some fun. This is the end result. I’m going to try another drawing, using some better blending techniques.


Recent Comments